Food and Cosplay

The Official Website of Food And Cosplay, where we share Photos and Articles relating to Cosplay and Comic-Con

Tutorial: “Where’s my Super Suit?” by King Of The North Cosplays

Bodysuits/Spandex suit have always played a big part in Cosplay, Superman, Spidey, Green Lantern. You see amazing Cosplays of these characters and more at every convention you go to. The detailed and colourful bodysuits play a huge part in bringing these characters to life.

Recently due to websites like Arachnid Studios, there has been a huge growth in bodysuits aimed at female cosplayers which has become incredibly popular, on top of that the designs for the suits have become far more detailed and more impressive, as has the way these designs are now printed onto the suits.
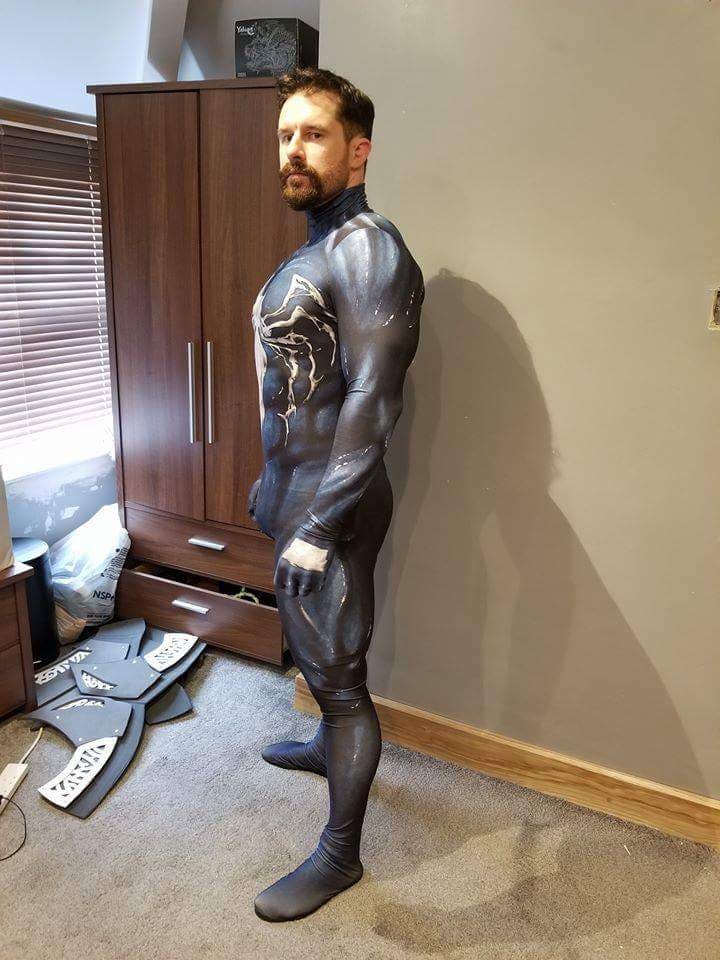
I myself have recently joined the super suit squad with Venom and Nightwing, so here’s my guide to getting yourself your very own super suit and becoming your own Superhero!

Ordering and Making it

So first you need to start by purchasing the suit pattern you like, this can be done through a website specializing in suit patterns like Arachnid Studios. Once purchased you will receive a download of your pattern.

Next save the pattern into your Googledrive.

Next you need to find yourself a suit printing site, I personally use Zentai Zone. They will print the pattern onto the material, sew it to your personal specifications and post it out to you.

Measurements 

First thing you need to do now is to enter your measurements, I suggest getting someone to help you as to get the most accurate measurements you can. This will ensure you get the best overall fit. For those that have no experience measuring up for these types of things (I had no clue with some initially. Below is a brief description of how to measure for your suit.

• Head Size – Circumference of largest part of your head.
• Height – From top to floor.
• Neck Size – Circumference of largest part of your neck .
• Shoulder Width – Shoulder to shoulder.
• Bust Size – Circumference of largest part of your chest.
• Waist Size – Smallest part of waist.
• Hip Size – Circumference of largest part of your hips.
• Thigh Size – Circumference of largest part of your thigh.
• Sleeve Length – Length from shoulder to middle finger including hand length.
• Biceps Circumference – Circumference of largest part of your biceps
• Wrist Size – Circumference of your wrist.
• Ankle Size – Circumference of your ankle

After entering your measurements, you’ll have the option to add extras to the base suit. These can be anything from a thicker material (Super Lycra), soles for the feet and hidden zips. These can be in the back or sides for ease of getting into the suit, wrists for phone use or to accommodate you toilet needs.

Finally before finishing your order, in the notes box copy and paste your Google Drive link to your pattern (Be sure your settings allow others permission to see the link.

Tips on wearing it for the men.

I can’t stress enough, but please wear a dancers belt whilst wearing your spandex costume.  You will be on display and it’s not a sight anyone at a family run comic con wants to see when meeting anyone in spandex costume. You can easily buy a belt from ebay or amazing and it’s relatively cheap to buy. 

I can’t wait to see more epic super suits at my next Con!

To see “King Of The North Cosplays” of Venom or Nightwing, you can on Instagram and Facebook

Other Tutorials
In this blog post, we’ll dive into the world of Coraberry Cosplay, an exceptional cosplayer who not only captivates with her incredible creations but also generously shares her wisdom through informative and inspiring cosplay tip videos. Coraberry Cosplay’s social media pages are treasure troves of valuable information, offering a wealth of cosplay tips and tricks to enthusiasts worldwide. Her dedication to the craft, attention to detail, and generous spirit make her a beloved figure within the cosplay community. By sharing her expertise through engaging videos, she inspires countless individuals to embark on their own cosplay adventures and reach new heights in their creative pursuits. So, if you’re ready to take your cosplay game to the next level, be sure to check out Coraberry Cosplay’s exceptional content – you won’t be disappointed! @coraberrycosplay I only occassionally ignore these tips. Cosplay is WILD #cosplay #cosplaytips #beginnercosplayer #beginnercosplay #cosplayadvice ♬ A Cruel Angel’s Thesis (Neon Genesis Evangelion Theme Rework) – Ginger Root @coraberrycosplay 🍓 How to Cosplay at a Convention 🍓 Cosplaying can be intimidating to do the first time you go, and after doing conventions and cosplaying at them for over 10 years, these are the things I reccomend for any newcomers wanting to go to their first convention! I have more cosplay tips like these all over my page and I hope they help you on your cosplay journey! #cosplay #convention #beginnercosplaytips ♬ original sound – Cora Berry | Cosplayer @coraberrycosplay Also a set of sharp scissors, not just the thinning ones! Wigs are a challenge for a lot of us, however even just the clips and the comb make it significantly easier. I only occasionally use the thinning scissors on my longer wigs. #cosplaywig #cosplaywigstyling #cosplaytools ♬ original sound – Cora Berry | Cosplayer Disclaimer: All images and videos used, do not belong to FnC and belong to their respective owners. Like this:Like Loading... [...] Read more...
I feel like history is repeating itself, with what I’m about to say.  Every so often when I send back photos back to people either cosplayers or models with my other photography page, 99% of the time I am rewarded with phrases like, “omg, I love them” or “they are gorgeous, can’t wait to share them”, and I’m both think to myself “wow I did a great job” and “Did I really do a great job?”  I will admit I do find it hard to handle praise from people, I don’t know why, just something from a young age. I do spend a lot of time looking at photos either through my social media feed, or when I’m looking up the cosplayers wall for what work they’ve already done so I don’t repeat it, I’m introduced to such wonderful array of work, which I at times have thought to myself, “wow, I can’t top that”. I know this shouldn’t and isn’t a competition with other photographers but I have a mentality that I want to get the best photos for someone and if I believe they got better photos from someone else, I would rather they used their photos.  I do shoot with people whom I regularly know or have become friends with. And more often there praise for my work is always there. But a little part of me always thinks, are they saying that as I’m their friend, we’ve worked together or they don’t want to hurt my feelings.  I want to believe that if my work needed more work or there was something fundamentally wrong, they can come tell me so I can rectify it. I know my pride will take a bit of a kicking but I rather try and resolve any issues, then my work not being used.  I’m not expecting all my work to be uploaded by the cosplayer or model, ultimately it’s their decision what they like to upload, but I try my best to make that decision to upload my work an easy one.  I do get told I’m there favourite photographer which I do question them about cause as previously mentioned, they probably have worked with so many talented photographers and I can’t picture myself being amongst them.  I’ll also admit that if I don’t hear these praises that I’ve not done a good enough job and that I’ll have to try harder. But at the end of the day, I must learn that praise is good regardless if it’s someone I know or a complete stranger who stumble entirely upon my page and leave a comment of, “I like your work”. I would want people to continue telling their photographers, especially your favourite ones, how much you like or love their work. Yes, it’s an ego feeding exercise but it’s something which some photographers work off.  I must learn that praise is a positive thing and regardless whether it’s friend obligations giving praise, or the same people saying the same thing, it’s a good thing to hear and it should push me to be better at what I do.  Let me know what you think. Do you find praise from family or friends good or do you take it with a “pinch of salt” Like this:Like Loading... [...] Read more...
Welcome to a new series by Charlotte of Charlotte Woolrych Photography who has kindly shared her knowledge of her photography skills and technique for us to learn from. This month, Charlotte will take you through the basic photography principles. Composition The first steps in learning to take a ‘good’ photo always starts with learning the basics, and in an art form such as photography, composition is a good basic to start with! Story telling in photography often relies on use of specific composition to show the viewer your intention. At first glance, this might seem like too much info BUT most of this blog is comprised of visual examples, as I think that’s the best way to learn – by seeing it in action! The Basic Composition Layouts: 1 – The Rule of Thirds What is the Rule of Thirds? Quite simply, imagine your photograph as being divided, both horizontally and vertically into thirds, by straight lines. (Many cameras show these lines on the screen when you turn your camera to ‘LV’ or Live-view mode!) Using both the line and spaces as a guide to composing your image is a way of guiding the eyes of people viewing your photography to the subject of the photo. In the photo above, the subject is clearly the centre of the middle column AND the bottom line, meaning that your eye is drawn to her. To frame the background, I have used the bottom line as the horizon line, to allow the top two-thirds of the image to be my sky or ‘negative space’ in this case. In Landscape Photography: For beginners, in landscape photography, it is often more pleasing to the eye to place the horizon line along either the bottom or top line of your image, rather than having it hover in the centre of the image. This shows the viewer if you want their attention is drawn to the sky or the landscape of the image. In Portrait Photography: Using the rule of thirds when taking portraits can DRAMATICALLY improve your photography fast and prevent you from making ‘beginners mistakes’. Newer photographers often tend to focus on the head of their model, and in the process leave far too much empty space above the head and cut off the lower half of the model awkwardly. Using the rule of thirds to place the models head in the top third of the image, reducing the amount of empty space, means that the viewer’s eye can be drawn directly to them. For closer portraits, drawing the top line through the eyes can be a good way of keeping the portrait nicely contained. For full-body portraits, position your model in one of the columns of your image, or down one of the lines to make them fit in with your background. 2 – The Vanishing Point, and Leading Lines The vanishing point is the point where if you carried on some of the main lines in your photo, they would eventually vanish. Leading Lines can be used with or without the vanishing point, to make your viewer look at a certain point in the image. In the image to the right, the leading lines of the bridge cause the viewer’s eyes to travel upwards to the boy on the bridge which otherwise the viewer might not have seen. These composition techniques are great for storytelling with your images and force you to really consider the photos you’re taking when in cities or nature. 3 – Head and feet space One of the most common beginner mistakes is cutting off the hair, or feet of their model when taking a ‘full body’ portrait. In order to make sure you don’t do this, try to visualise a small rectangle above the head of your model, and one about half the size below the model’s feet. Clearly here I have allowed more negative space for the sky, but I have used the principle to ensure I did not cut my feet off! Using this photo as an example, let’s look at how it applies the 4 composition rules we have seen so far. The path through the crops, and my eyeline show the vanishing point, which curves the same direction as my gaze, making leading lines. I am in the middle third of the photo, with the horizon on the bottom line to make space for the sky and my head and feet are firmly in the photo! Rules are made to be broken, especially compositional rules, but you should learn the rules first so you can break them with intention! Just knowing these 4 rules should help you skip out on some of the mistakes beginners always make (having awkwardly composed photos or cutting off the subjects’ limbs). Good luck and happy creating Like this:Like Loading... [...] Read more...
A continued series from Charlotte Woolrych Photography where she shares how photography skills and knowledge. This month she goes through the setting and modes on a camera and explains what each one means. Everyone can take stunning photos, even when the camera is on automatic mode. The tricky part comes when trying to recreate the lighting in your favourite photos! On automatic mode, it is not always possible, so the best thing to do is to start experimenting with the other modes your camera offers you, so you can recreate lighting, and play with lighting to your heart’s content.  Manual Mode (M) Manual mode on your camera can be broken down into 3 sections. You control; a) the speed at the image is taken. (shutter speed) b) the basic light level of the image (ISO) c) how large or shallow the depth of field is (aperture). These three sections are balanced against each other to allow you to have 100% control over how your photos look. Let’s break it down visually.  a) Shutter Speed. The first thing you will notice when playing with the shutter speed on your camera is that the faster the speed, the darker your image is. This is because there is less time for light to enter and be read by the camera. A slower shutter speed allows more light into the camera, and therefore your images are lighter BUT the longer you shutter is open, the more blurry your images can become.  b) Aperture. Aperture controls your depth of field, e.g. how much of your image is in focus, and how much is blurred. It is noted on your camera as f/ and is also known as the ‘f-stop’. For me, this is most important in portraiture as it is what I use to create the beautifully blurred background, that allows me to separate my model from any directions.   The smaller the number of the f-stop the more open your camera’s aperture is. This does two things, allows more light to enter the lens, and also makes the depth of field very shallow.   A larger f-stop allows more of the image to be in focus but also makes the image darker. c) The ISO. ISO was originally used to reference the sensitivity of film for film cameras. In digital cameras, I use it as the final adjustment for photos, if I want to make my images lighter or darker, and I do not want to change my other settings. Simply, the higher the number of your ISO, the lighter your image will become. The only downside is if you raise the ISO too far, you can start to see the grain in your photos (they look dusty), as this is the effect that too much ISO can have. Normally I can get away with raising the ISO to about 1000 or slightly more without seeing too much grain in my photos, but it’s definitely something to bear in mind! Some Speedy Practical Advice:  Sports Photos: Your priority is not blurring the players, and therefore you should set you shutter speed as your priority, and adjust the lighting using the aperture (note a shallower depth of field will make focusing harder) and the ISO.   Portrait Photography: Your priority here is often aperture, personally I prefer a shallow depth of field to create a lovely creamy bokeh background, so I use my shutter speed to control the lighting.   Family/Group Photos: You will need to have a wider depth of field, to make sure that no-one’s face gets blurred out. Similarly, I would use shutter speed then ISO to fix the lighting here.  Other Camera Modes:  M – Personally I prefer to use manual mode as I find it the easiest when I am making all the camera choices. However you do have other options when it comes to your camera!  S – Shutter Priority mode. In this mode, you select the shutter speed appropriate for your subject, and the camera works out an appropriate aperture and ISO for you.  A – Aperture Priority mode. In this mode, you select the aperture (depth of field) appropriate for your subject, and the camera works out an appropriate shutter speed and ISO for you.  P – (On Nikon) Programmed Auto. In this mode the camera selects an appropriate aperture and shutter speed for you, but you can scroll through and choose from a few combinations that it offers you! I used this as my mid-point between fully automatic and manual mode, as the camera is better at reading light in this mode.   I hope this helps as an easy visual introduction into what each of the settings on your camera does. Whilst it can get more technical than this, to learn manual mode all it takes is practice balancing the three settings against each other. Enjoy practising and having fun with lighting!   Happy creating   Like this:Like Loading... [...] Read more...
Just to give you a bit of background myself. I took up photography in 2012 and have been steadily improving over the years picking up tips and tricks along the way and also passing on what I know to others. Lack of Watermark During this time, things that didn’t matter or bother me much now do. An example, at the start I didn’t add a watermark on each photo until I found it on a site that didn’t credit me but there was no way to really prove it was my work (see photo below taken in 2012). So from that day, I started adding my watermark. Velma Cosplay by Gina B Cosplay. Road to Learning But over the last few months, what really has bothered me which caused that massive rant post you can see at the top of this post, is the number of people who edit my photos. Let me say this now, I DO NOT ALLOW ANYONE TO EDIT MY PHOTOS WITHOUT MY PERMISSION. There are only a few occasions where I have given permission.  As I mentioned I am still learning my trade and need to know what I need to look out for to edit or improve a photo. I personally like to keep to the original look as possible but I do understand a bit of skin smoothing, taking out the bumps and slight tuck here gives the cosplayer/model a confidence boost. But I would like to be told of this so I can improve my skill or learn a new skill. I don’t like when I discover that the cosplayer has taken it upon themselves to edit the photo without telling me, even though I have said to them “Please let me know first if you want to edit the photo”. I am not saying I’m great at editing everything correctly and I will admit I do miss things every so often, and this is why I appreciate people letting me know of areas they like editing, so I know for future reference. For what I do, basic editing as I call it, I spend between 10-30 mins just colour correcting, cropping, and adding radical/gradient filters to the photos. For everything else, I have to put it through Photoshop. I know 10 minutes isn’t a long time but at a comic con weekend, I have to filter through over 2000 photos and then process each photo individually, which takes me a few days to get through them. One of my edits As you can see below, with a recent photoshoot with Squeakehb as Livewire, the image on the left is the finished photo and on the right is the original. This is the level of editing I am comfortable with, before going into major composite editing. It was great to see people like Sqeukahb sharing this photo as I presented it to her. Instagram filters and anything similar Instagram filter……again, I do not like it. It’s the same principle as changing the photographer’s original version of the photo. I really don’t think it’s that hard to ask the photographer if it’s okay to edit or add a filter on top before it goes out. But saying that, I think most photographers will like to have their work as it was presented to the cosplayer. I hope this gives a bit of an insight into why I and other photographers get annoyed when their work gets edited without permission. For more cosplay photos, visit our Twitter, Instagram, Threads and Facebook page Twitter Instagram Facebook WordPress Like this:Like Loading... [...] Read more...
When it comes to knowing where to crop a photo, it’s really important to know where exactly you can and can’t crop a photo when you have someone in the photo. This was one of the first lessons taught to me when I was asking other photographers for help on taking a photo. This seemed to be very important to the person who gave me this advice which I have tried to implement into each of my photos. The main rule I was given was to make sure not to frame the photo on a joint such as elbows, wrists, knees, or ankle, a clever way of remembering it is if it bends don’t crop it. You can crop across the joint just not through it, but make sure you leave enough joint showing to show it is still connecting to the same limb and not look like it’s a phantom body part. Another piece of advice is to make sure you crop as much as you need in-camera and not post while editing, as you want to retain as much detail in the photo. Don’t be afraid to take different distances of the same photo so that if you aren’t happy with the framing in one photo you can use a different distance and crop in a little to retain that level of detail. One last piece of advice from me, when cropping in either in-camera or editing, make sure you crop in what you want the viewer to see. If there is a background object you think will be distracting and if it can be cropped out, then do so. You want to crop as much of what you want the viewer to see. If for some reason you see the costume is falling apart but no one noticed on the day, but it can be cropped out, then do so, as the viewer won’t know what it can’t see. This post I found by Focused Camera explains how best to crop a person in a photo. View this post on Instagram A post shared by FocusEd Camera (@_focusedcamera) Disclaimer: All images and videos used, do not belong to FnC and belong to their respective owners. Like this:Like Loading... [...] Read more...
A continued series from Charlotte Woolrych Photography where she shares how photography skills and knowledge. This month she goes through the setting and modes on a camera and explains what each one means. Everyone can take stunning photos, even when the camera is on automatic mode. The tricky part comes when trying to recreate the lighting in your favourite photos! On automatic mode, it is not always possible, so the best thing to do is to start experimenting with the other modes your camera offers you, so you can recreate lighting, and play with lighting to your heart’s content.  Manual Mode (M) Manual mode on your camera can be broken down into 3 sections. You control; a) the speed at the image is taken. (shutter speed)b) the basic light level of the image (ISO)c) how large or shallow the depth of field is (aperture). These three sections are balanced against each other to allow you to have 100% control over how your photos look. Let’s break it down visually.  a) Shutter Speed. The first thing you will notice when playing with the shutter speed on your camera is that the faster the speed, the darker your image is. This is because there is less time for light to enter and be read by the camera. A slower shutter speed allows more light into the camera, and therefore your images are lighter BUT the longer you shutter is open, the more blurry your images can become.  b) Aperture. Aperture controls your depth of field, e.g. how much of your image is in focus, and how much is blurred. It is noted on your camera as f/ and is also known as the ‘f-stop’. For me, this is most important in portraiture as it is what I use to create the beautifully blurred background, that allows me to separate my model from any directions.   The smaller the number of the f-stop the more open your camera’s aperture is. This does two things, allows more light to enter the lens, and also makes the depth of field very shallow.   A larger f-stop allows more of the image to be in focus but also makes the image darker. c) The ISO. ISO was originally used to reference the sensitivity of film for film cameras. In digital cameras, I use it as the final adjustment for photos, if I want to make my images lighter or darker, and I do not want to change my other settings. Simply, the higher the number of your ISO, the lighter your image will become. The only downside is if you raise the ISO too far, you can start to see the grain in your photos (they look dusty), as this is the effect that too much ISO can have. Normally I can get away with raising the ISO to about 1000 or slightly more without seeing too much grain in my photos, but it’s definitely something to bear in mind! Some Speedy Practical Advice:  Sports Photos: Your priority is not blurring the players, and therefore you should set you shutter speed as your priority, and adjust the lighting using the aperture (note a shallower depth of field will make focusing harder) and the ISO.  Portrait Photography: Your priority here is often aperture, personally I prefer a shallow depth of field to create a lovely creamy bokeh background, so I use my shutter speed to control the lighting.  Family/Group Photos: You will need to have a wider depth of field, to make sure that no-one’s face gets blurred out. Similarly, I would use shutter speed then ISO to fix the lighting here.  Other Camera Modes:  M – Personally I prefer to use manual mode as I find it the easiest when I am making all the camera choices. However you do have other options when it comes to your camera! S – Shutter Priority mode. In this mode, you select the shutter speed appropriate for your subject, and the camera works out an appropriate aperture and ISO for you. A – Aperture Priority mode. In this mode, you select the aperture (depth of field) appropriate for your subject, and the camera works out an appropriate shutter speed and ISO for you. P – (On Nikon) Programmed Auto. In this mode the camera selects an appropriate aperture and shutter speed for you, but you can scroll through and choose from a few combinations that it offers you! I used this as my mid-point between fully automatic and manual mode, as the camera is better at reading light in this mode.   I hope this helps as an easy visual introduction into what each of the settings on your camera does. Whilst it can get more technical than this, to learn manual mode all it takes is practice balancing the three settings against each other. Enjoy practising and having fun with lighting!   Happy creating   Like this:Like Loading... [...] Read more...
Welcome to a new series by Charlotte of Charlotte Woolrych Photography who has kindly shared her knowledge of her photography skills and technique for us to learn from. This month, Charlotte will take you through the basic photography principles. Composition The first steps in learning to take a ‘good’ photo always starts with learning the basics, and in an art form such as photography, composition is a good basic to start with! Story telling in photography often relies on use of specific composition to show the viewer your intention. At first glance, this might seem like too much info BUT most of this blog is comprised of visual examples, as I think that’s the best way to learn – by seeing it in action! The Basic Composition Layouts: 1 – The Rule of Thirds What is the Rule of Thirds? Quite simply, imagine your photograph as being divided, both horizontally and vertically into thirds, by straight lines. (Many cameras show these lines on the screen when you turn your camera to ‘LV’ or Live-view mode!) Using both the line and spaces as a guide to composing your image is a way of guiding the eyes of people viewing your photography to the subject of the photo. In the photo above, the subject is clearly the centre of the middle column AND the bottom line, meaning that your eye is drawn to her. To frame the background, I have used the bottom line as the horizon line, to allow the top two-thirds of the image to be my sky or ‘negative space’ in this case. In Landscape Photography: For beginners, in landscape photography, it is often more pleasing to the eye to place the horizon line along either the bottom or top line of your image, rather than having it hover in the centre of the image. This shows the viewer if you want their attention is drawn to the sky or the landscape of the image. In Portrait Photography: Using the rule of thirds when taking portraits can DRAMATICALLY improve your photography fast and prevent you from making ‘beginners mistakes’. Newer photographers often tend to focus on the head of their model, and in the process leave far too much empty space above the head and cut off the lower half of the model awkwardly. Using the rule of thirds to place the models head in the top third of the image, reducing the amount of empty space, means that the viewer’s eye can be drawn directly to them. For closer portraits, drawing the top line through the eyes can be a good way of keeping the portrait nicely contained. For full-body portraits, position your model in one of the columns of your image, or down one of the lines to make them fit in with your background. 2 – The Vanishing Point, and Leading Lines The vanishing point is the point where if you carried on some of the main lines in your photo, they would eventually vanish. Leading Lines can be used with or without the vanishing point, to make your viewer look at a certain point in the image. In the image to the right, the leading lines of the bridge cause the viewer’s eyes to travel upwards to the boy on the bridge which otherwise the viewer might not have seen. These composition techniques are great for storytelling with your images and force you to really consider the photos you’re taking when in cities or nature. 3 – Head and feet space One of the most common beginner mistakes is cutting off the hair, or feet of their model when taking a ‘full body’ portrait. In order to make sure you don’t do this, try to visualise a small rectangle above the head of your model, and one about half the size below the model’s feet. Clearly here I have allowed more negative space for the sky, but I have used the principle to ensure I did not cut my feet off! Using this photo as an example, let’s look at how it applies the 4 composition rules we have seen so far. The path through the crops, and my eyeline show the vanishing point, which curves the same direction as my gaze, making leading lines. I am in the middle third of the photo, with the horizon on the bottom line to make space for the sky and my head and feet are firmly in the photo! Rules are made to be broken, especially compositional rules, but you should learn the rules first so you can break them with intention! Just knowing these 4 rules should help you skip out on some of the mistakes beginners always make (having awkwardly composed photos or cutting off the subjects’ limbs). Good luck and happy creating Like this:Like Loading... [...] Read more...
Many of us have been doing our part for the community whether that’s fundraising, helping a neighbour or sewing scrubs and masks for the NHS and keyworkers. The UK government have now advised to wear masks or face coverings in confide areas where its hard to social distance. From the 15th June masks/fade coverings are mandatory and must be worn on public transportation throughout the UK. I live in the South West which currently has the R rating of 1, which means there’s a high chance of coming in contact with someone who is carrying the virus Covid-19. To protect myself, friends and family I have been sewing face coverings from my cotton stash I’ve hoarded over the years from cosplay making. I found a free sewing pattern for face coverings online from craftpassion.com. The sewing pattern was perfect for myself as I have to wear glasses. This handy sewing pattern came with an option to place a small piece of fabric into the lining of the mask to hold a piece of wire which can be moulded to the nose. The pattern also came with two other varieties to choose from, Simple face covering and a face covering with an inner pouch to place some sort of filter in between the two layers. I love that you can make varied face-covering depending on different needs of friends and families. One pattern to do them all. Starting this tutorial I urge everyone to read the whole way through each variety as some steps are the same across all the options. I also advise using a 1.5″ allowance on the outer ear side when doing option 2. The filter pouch. This helps a lot when folding to make the tunnels for the elastic later. The tutorial is self-explanatory and quite easy to understand if you’ve done a bit of sewing before. In one evening I did 3 face coverings from 2 cotton fat quarters. I used garden wire for the mouldable wire around the nose. This can be easily removed when washing the face coverings. I had some difficulty buying some elastic due to demand, however, in the tutorial, it shows you what other options are available to fasten the covering in place. Making these have been keeping me busy through the last part of lockdown. It also means I’ve been reusing, recycling and keeping my family safe, which makes me feel good. Only another 20 or so to sew. Note that these masks are to be used in non medical situation, such as travelling on public transport. This article was written by Stephanie who was lovely to share her experience in making fabric masks. Please note, there are other guides you can follow should this recommendation doesn’t suit your needs. Like this:Like Loading... [...] Read more...
We’ve all gone online to look at someone’s work or got a notification to say your favourite person has posted a new photo and it’s a fantastic piece of work. There has been a time when I’ve uploaded work on my own social media pages which haven’t been to the standard I wished it was.  This has nothing to do with the cosplayer in the photo but more how I’ve edited it, the photo is blurry, pose the cosplayer now looks odd, the colours or just doesn’t fit with other photos in the set.  In the past I have ignored my gut and posted photos I later think to myself I should have a better quality control on my feed, cause I have to remember that my social media feed and website posts I post represent not only my work but the best part of my work which I want to show off. If a potential client who’s undecided about working with me, sees work which are below my standards, that might turn away and look elsewhere. Or stops attracting more people to follow more of my social feed if I don’t keep a good or high standard of output work.  I do try and keep my main feed on Instagram photos of cosplays or food I’ve taken and have recently moved my “silly” selfies to either into my Instagram stories or Twitter. I don’t expect everyone whom I have taken photos of will share my photos. Cause are going through the same quality control and looking for the best photo or pose to show off their work. I think we’ve all been guilty of uploading photos to social media because it’s the only photo you got back of your cosplay and just wanted to show off your cosplay or you get back photos which aren’t too your liking. But I say, if you’re proud of your cosplay, don’t upload photos which are below your quality of standard. For cosplayers, don’t be afraid of taking and uploading photos from your camera phone, the quality of modern camera phones are improving all the time and also you get to control what photo you want there and then, no waiting for the photographer to send you photos.  Also if you didn’t get photos back from a comic con event or don’t like the aesthetic of the comic con environment, why not set up a location shoot with your photographer or cosplayer. This may involve money but talk to your photographer or cosplayer to either discuss rates or agree if can be TFP. Just make sure before a single photo is taken, what goals both are looking to get from the photoshoot.  Make sure you check what you upload onto social media is what you want to represent yourself. It’s very hard to take something back if it can be misinterpreted or cause offence. Things can be screenshot and spread across the internet very quickly in a “cancel culture” we now live in. Being picky about what goes into your social media feed isn’t a bad thing. Like this:Like Loading... [...] Read more...
Hey fellow Readers. My name is Michael (aka MW Cosplay), I am writing this article to share my journey on making my #ScrapEpicChallenge Samurai Giratina from Pokemon. To start off let me break the ice and introduce myself! I’m 27 years old and have been Cosplaying for over 7 Years working on Cosplays from Various Games including the all popular Pokemon, Most of my Cosplays Focus on Pokemon Gijinkas (Humanization), basically turning something non-human to A Human. Many Gijinkas focus on turning their designs into various styles of characters such as Warriors to frilly outfits focusing on their chosen Pokemon. So the #ScrapEpicChallenge is to use scraps and spare materials all around the house as well as a £20 budget to make a brand new Cosplay from it. On my journey, I would admit this was a very fun challenge to do due to the materials I had salvage or just kept because I am a massive hoarder and hate throwing stuff away I decided to Cosplay Giratina From Pokemon. Because I had various colours for that specific Pokemon, To start off my Pokemon Gijinka Designs I like to think of a “Theme/Trait” as then I can build around the said theme and add parts of Giratina then I thought “hmmmm….Samurai!”. Here are the materials I used for Making Giratina: Red/Black Silky Fabric which was used to make the Chest, Back, Shoulder and Side Pads which were just Cardboard with the Fabric Glued on. Yellow and Grey strips (offcuts of fabric I think) which I found whilst on Holiday which were the main ingredient for attaching all the pads together using the traditional threading technique that Samurai have punching holes and using a Single Crochet Needle. This took me hours (at least 3 seasons of FRIENDS) but was so worth it as the armour itself is very secure and held up just these Fabric Strips. Eva Foam Which I had various Scraps To make the Helmet, then threading Red Fabric for that Samurai Design on the back of the Helmet The Sword was made from a single piece of wood used to support fences, sanding it down to a smooth finish and making it as close to an ōdachi (Long Sword). The Clothing underneath the Armour was just normal Black Trousers and Shirt, followed with a Poncho that I already had as well as another Grey Thick Blanket which I bought to use to cover the legs. Photographed by Ga Chun Yau Photography Photographed by Ga Chun Yau Photography Here is also the full Price list and the hours and the Complete Cosplay! Red/Black Fabric – FREECardboard – FREEPoncho – Already HadFoam – Already HadWood for Sword – Already Had Grey/Yellow Fabric Roll – £5Grey Blanket – £3.25 Hot Glue – £4 Various Crochet Needles – £1Total Cost – £13.25 Hours worked on making this costume Sword – 6 HoursArmour – 100 HoursHelmet – 72Total – 178 Hours To conclude this challenge I would like to say that it shows you do not need expensive tools or materials to make something impressive. When I started telling other Cosplayers about my journey they were all impressed that it was just cardboard and fabric. Doing this Task, I learnt many different techniques as well as bringing previous skills to make this Outfit (which survived MCM London with just a few threads snapping), which I would like to say bust the myth that you need to spend lots of money on your Cosplays and can still look visually awesome. Anyone can do this challenge and I hope you fellow cosplayers take it on too. Be Proud to be yourself! Article written by MW Cosplay who has given his time to write this article. Thank you. Disclaimer: all images used, do not belong to FnC and belong to their respective owners. Like this:Like Loading... [...] Read more...
I feel like history is repeating itself, with what I’m about to say.  Every so often when I send back photos back to people either cosplayers or models with my other photography page, 99% of the time I am rewarded with phrases like, “omg, I love them” or “they are gorgeous, can’t wait to share them”, and I’m both think to myself “wow I did a great job” and “Did I really do a great job?”  I will admit I do find it hard to handle praise from people, I don’t know why, just something from a young age. I do spend a lot of time looking at photos either through my social media feed, or when I’m looking up the cosplayers wall for what work they’ve already done so I don’t repeat it, I’m introduced to such wonderful array of work, which I at times have thought to myself, “wow, I can’t top that”. I know this shouldn’t and isn’t a competition with other photographers but I have a mentality that I want to get the best photos for someone and if I believe they got better photos from someone else, I would rather they used their photos.  I do shoot with people whom I regularly know or have become friends with. And more often there praise for my work is always there. But a little part of me always thinks, are they saying that as I’m their friend, we’ve worked together or they don’t want to hurt my feelings.  I want to believe that if my work needed more work or there was something fundamentally wrong, they can come tell me so I can rectify it. I know my pride will take a bit of a kicking but I rather try and resolve any issues, then my work not being used.  I’m not expecting all my work to be uploaded by the cosplayer or model, ultimately it’s their decision what they like to upload, but I try my best to make that decision to upload my work an easy one.  I do get told I’m there favourite photographer which I do question them about cause as previously mentioned, they probably have worked with so many talented photographers and I can’t picture myself being amongst them.  I’ll also admit that if I don’t hear these praises that I’ve not done a good enough job and that I’ll have to try harder. But at the end of the day, I must learn that praise is good regardless if it’s someone I know or a complete stranger who stumble entirely upon my page and leave a comment of, “I like your work”. I would want people to continue telling their photographers, especially your favourite ones, how much you like or love their work. Yes, it’s an ego feeding exercise but it’s something which some photographers work off.  I must learn that praise is a positive thing and regardless whether it’s friend obligations giving praise, or the same people saying the same thing, it’s a good thing to hear and it should push me to be better at what I do.  Let me know what you think. Do you find praise from family or friends good or do you take it with a “pinch of salt” Like this:Like Loading... [...] Read more...
If you like wearing costumes or doing cosplay, you know just how expensive this hobby can get. But you can avoid all those expenses relatively easily. You just have to make your own costumes. You can also make them for someone else and earn yourself some nice pocket money. It might seem complicated at first, but if you know a few tips and tricks, you can master it pretty quickly. If you like the thought of sewing cosplay and costumes, stick around for a while and check out this article. Because today we’ll be showing you how to do just that. Cosplay by Uncanny Megan Choose the right fabric and machine Costume sewing is quite different than normal garment sewing. For starters, costumes are made to look good but not to be worn very often. That is why the fabric that you use to make a costume shouldn’t have the same properties as those materials you use when sewing regular clothing. Costumes are meant to be photographed, keep that in mind while choosing the fabric you’ll be using. Shiny materials are out of the question because they’ll ruin the picture with a shiny spot or a flash. Another thing to keep in mind is the character. A costume should depict the character realistically. In other words, you can’t wear synthetic toga, it has to be made from cotton. You also can’t be Catwoman in silk, she wears nothing but leather. Last but not least, your costume needs to be comfortable. You will be wearing it during the entire day, so it has to be made from breathable fabrics, if possible. According to Hellosewing, your first sewing machine should be durable, convenient and simple to use. Always to choose quality over bells and whistles. Structure is important A costume which doesn’t have the right structure could easily become a floppy piece of fabric. An eighteen-century dress without a crinoline is just a limp, oversized piece of clothing. Construct the proper interfacing and your costumes will hold up the way it should and look just like it’s supposed to. Large gowns require a petticoat or a few of them. Corsets need sturdy boning. And long coats need a nice waistline. Experimenting is always welcomed, so don’t be afraid to try something new. Go crazy with the details The most fun part of costume sewing is the freedom you get to enjoy when working on small details. Techniques you would almost never use when sewing normal clothes are more than welcomed here. Embroidery of various kinds, crazy trims, heavy ornamentations, they can all be utilized and put to good use. Cosplay by whatserscosplay Don’t forget the accessories A proper costume consists of more than just the outfit you’ll be wearing. Gloves, hats, belts, scarfs, and bags complete the costume and make it finalized. A steampunk outfit is nothing without some fingerless gloves and a cool hat. You can’t go overboard with accessories so don’t shy away from making a couple of them for each one of your costumes. Great pattern equals great costume Before you start sewing anything, you need to make a pattern first. You can find a lot of them online with just a simple search. Once you decide on a couple, try to visualize how they would look. Then alter them accordingly and create something of your own. You can also combine two or more patterns into one. Let your imagination run wild and see what it creates. I hope you enjoyed reading this article. Now you are ready to start sewing amazing costumes and cosplay. If you want to read more articles from HelloSewing, go to their page for more tips and articles like this. Please note: Images used are addtions to the article, not linked to the subject matter. Photos used in this article are the property of Food And Cosplay. Like this:Like Loading... [...] Read more...
With MCM London Comic Con, arguably the most anticipated convention of the summer over, the fun doesn’t have to stop there! In this article, I’m talking about not only easy ways to prepare for October but everyday options too. There’s a couple of ways to go about casual / closet cosplays and its all about what works for you. Closet Cosplays: To me, closet cosplay is building an almost accurate costume with things you already have in your wardrobe. Of course, this is all down to interpretation. I have done a few closet cosplays myself because of time, money or situations. My first ever cosplay was a closet cosplay because I didn’t know I was attending the convention until 8 am the morning of. Luckily I had a shirt, shorts and a top hat and thus Zatanna happened! That was 5 years ago. People still knew who I was trying to be, I made friends and connections and it was exactly what I needed for me to want to cosplay more. I think it’s a great way to dip your toes into the pool of cosplay and seeing if you like it. Even after cosplaying for many years it’s still great to do a closet cosplay because sometimes it just works better! Take my Nightman from It’s Always Sunny in Philadelphia as an example. The show uses a black karate outfit as the costume but as someone who hasn’t done karate in years and didn’t want to buy a whole suit, my wardrobe had the answer. Nightman consisted of my yoga trousers, a wrap style top, and my trainers. To this day, it’s been one of my most fun cosplays and that’s what it’s all about! Garth from Wayne’s World was another closet cosplay apart from the specific Aerosmith t-shirt which was cheap and easy to source. Cosplays don’t have to be big, showy and expensive to be “worth it” or deemed as the best. Did you have fun? That’s what matters. I have spoken before about attitudes in cosplay and cant stress it enough. Casual Cosplays: There are so many different ways to do casual cosplays from everyday versions of characters, Disney bounding or basically whatever you can think of. This is something that I love seeing either at cons or after because people use interpretation. The creativity and originality of ideas is something to be celebrated and these are great chances too! I only have a few experiences with casual cosplays but it’s something I’m looking to do more of! My few experiences consist of Tourist Joker and Harley Quinn for a shoot in London and a mild attempt at Disney bounding. I say mild as I didn’t really change from the reference. I could have made it more “human and realistic.”By realistic, I could reference current fashion styles and use that to design a garment. These are not criticisms but ideas to note for myself next time I do it. Needing inspiration? My first suggestion as always is base it on something you love. You are proven to be more motivated when you are passionate, let that guide you. There are also loads of resources online to get inspiration as well as plan an outfit. Tumblr blog Cosplay All The Things has pages of everyday, casual outfits based on characters. If Tumblr isn’t your thing, Pinterest has loads too! As for planning, I used to use a site called Polyvore. I have found out that it has been shut down in the last few years but there are recommendations for others that do similar. If none of the sites work for you there are apps like PicCollage. The use of these is to draft the items and get a feel for what your outfit will look like and what your shopping for. Then you can get making or buying with the guide you’ve put together! And there we have it, casual and closet cosplays and why they are great! If you are working on any or have tips, comment! There’s a whole community here who will celebrate your ideas! Like this:Like Loading... [...] Read more...
If you weren’t already aware, last month Gearbox made the long-awaited announcement for Borderlands 3. Of course, with this epic new announcement comes all the cosplay feels so what better to talk about than the art of cel-shading. What is cel-shading? Cel-shading is an animation technique where three-dimensional objects are rendered to appear two-dimensional and thus have a hand-drawn feel like a comic book in 3D. This style in video games has actually been around since the early 90’s and can be found in games such as Parappa the Rapper for the PlayStation and later in 00’s with the Fear Effect games. However it is not just the drawn textures that create this look, it is also all in the shading and lighting techniques. Thus the term “cel-shading”. My personal introduction to the cel-shaded look in video games was with the epic Borderlands series. Not only is this style hugely effective and now popular in gaming it is also used to great effect in television shows such as Archer. Of course, this style of cartoon-turned-3D art caught the attention of cosplayers and is a wonderful way to elevate your cosplay from not only looking and dressing like a real life version of an animated character but also appearing animated in real-life, mirroring this 3D cartoon magic. My first attempt at using cel-shading as a make-up and fabric-painting technique was in 2014 with my Lilith “The Firehawk” costume from Borderlands 2. Lilith is one of my favourite video game characters and while I am still very proud of this costume and my first cel-shading attempt I have since realised there is one key aspect that would upgrade the look of this costume. SHADING. My Lilith costume took months of slowly adding black outlines to all elements of the costume with fabric markers and paint. For the makeup I first applied “normal” make up in Lilith’s style and used black eyeliner to add the drawn lines to my features. While this worked to a certain extent and still creates a striking look if I were upgrading this costume I would take the time to think about lighting angles and enhance the thick black lines with white highlights. Despite the lack of depth this costume still incorporates one of my favourite props; my DAHL pistol, which was created with a base of spray paint, acrylic for the details and a black sharpie on all outlines and edges. Two years later, in 2016 I decided to attempt another cel-shaded character, Mallory Archer from the FX adult cartoon “Archer”. This time around I took notice of the lighting that gives the figures their 3D appearance in a 2D world instead of just relying on my own 3D existence to draw black outlines onto. I first made Mallory’s dress, sourced the belt, handbag and shoes and noticed from reference pictures the areas of grey for shadow and set about painting the shadows onto the entire outfit. As this required A LOT of paint and fabric paint generally comes in very small containers I purchased some “fabric medium” to mix with normal acrylic paint. This is designed to turn regular paint into fabric paint and works wonderfully. I also incorporated the shading into my makeup by contouring my nose with a taupe eye-shadow and covering half of my neck and face with this shadow as if there was a light source coming from one side of my body. This, along with using varying thickness of black outlines gives the look more depth than just drawing simple outlines. Mallory also has some areas of white highlight on her lips and other characters from the show have many more areas of highlight on their clothing and hair. The only real-life problem that you will come across with manually adding light and shadow to your costume and make-up is that you have to pick a direction the fake light is coming from and stick to it. For animation this works because the light will shift from frame to frame but when walking around a convention hall in real life your makeup may be styled with shadow on the left and your fake light source on the right yet you may stop for a photo with the sun shining from your left side. Unfortunately this is an unavoidable pitfall of bringing an animated character into the real world but it doesn’t make final look any less impressive. As the use of real-life cel-shading has become more popular in the cosplay community so has the artistic skill level and attention to detail of the cosplayers. Check out this intricately shaded Handsome Jack by Mary & Feinobi cosplay. And this stunning Tiny Tina wig by LMcosplays. In conclusion, if you are thinking of adding cel-shaded detail to your costumes, pay attention to the thin/thick changes in outline, remember to add white highlights and think about the direction of your “light-source” how it hits creases in clothing and angles on your face, play about with light and shade and have fun! Like this:Like Loading... [...] Read more...

Next Post

Previous Post

5 1 vote
Article Rating
Subscribe
Notify of
0 Comments
Inline Feedbacks
View all comments

© 2024 Food and Cosplay

Theme by Anders Norén

0
Would love your thoughts, please comment.x
()
x